Order Maintenance |

|
Add and receive orders, track purchases, and review current and previous orders by all or specific parameters within Order Maintenance.
Jump To:
| Order/Purchase | Email/Preview_Orders | Delete_Pending_Order | Receive | Return | Cancel_Order | Price_Adjustment | Order Reports |
Order Maintenance
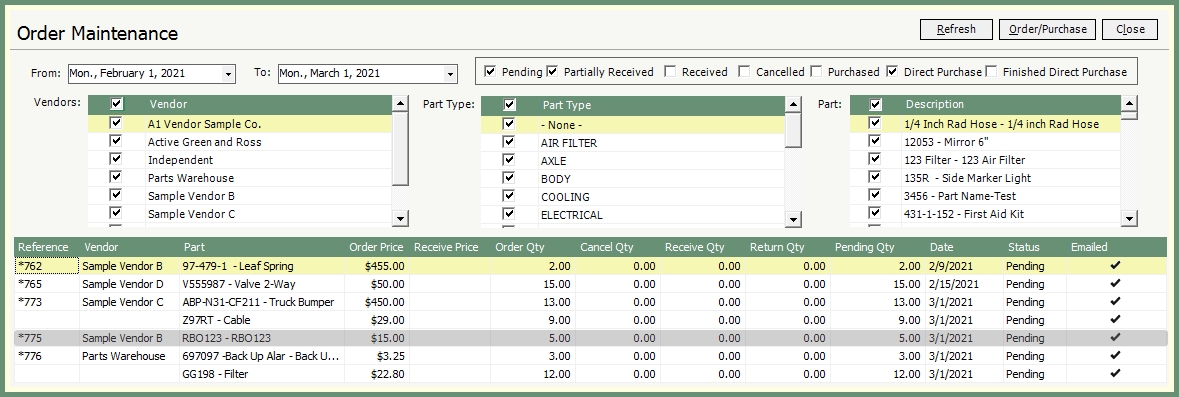
-
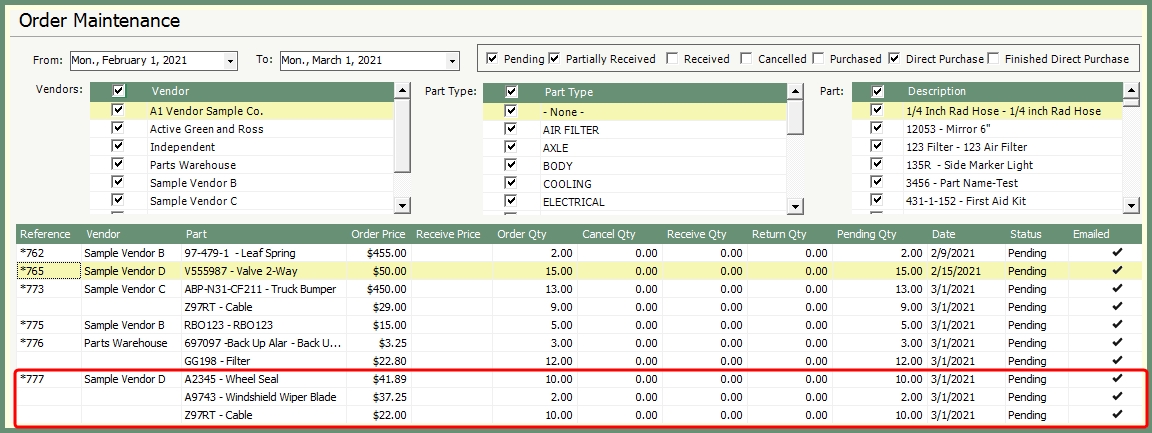
The grid will default to all outstanding orders in the displayed date range.
-
All Vendors, Part Types and Parts will be selected by default and are the typical method for viewing orders.
-
To change the orders displayed in the grid; the dates, status, vendor and part criteria can be changed to meet your specific needs.
-
Items in gray are marked as Finalized and cannot be changed.

Enter orders and purchases for parts by vendors for inventory as well as direct purchase parts for asset repair orders.
-
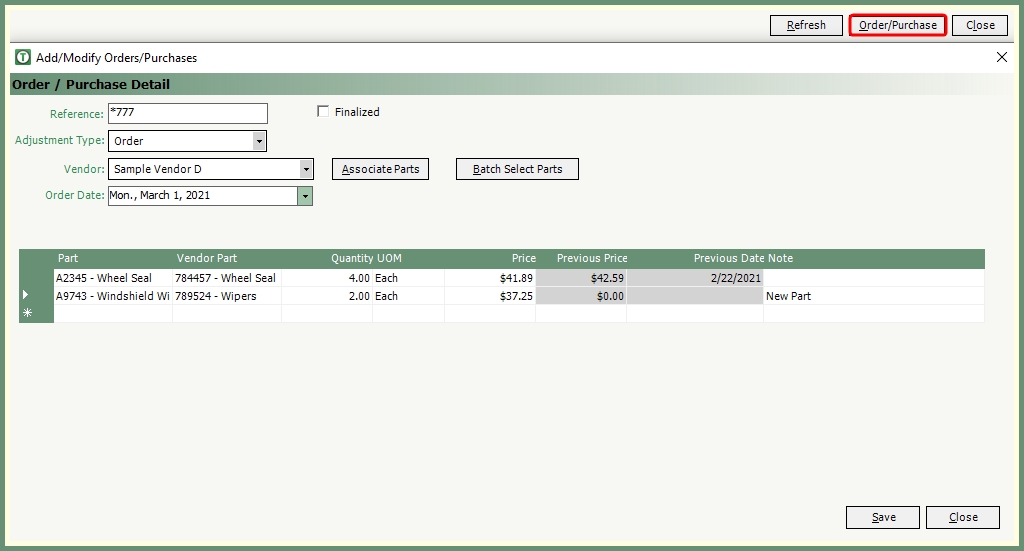
Click Order/Purchase.
-
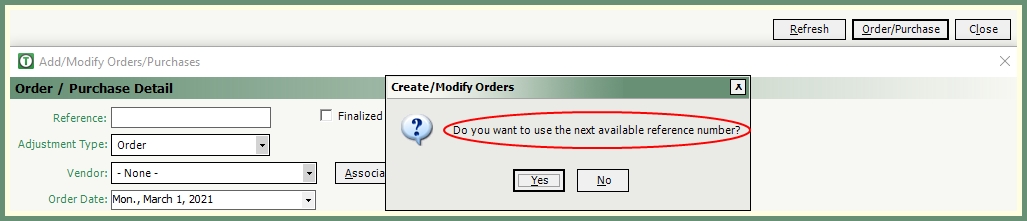
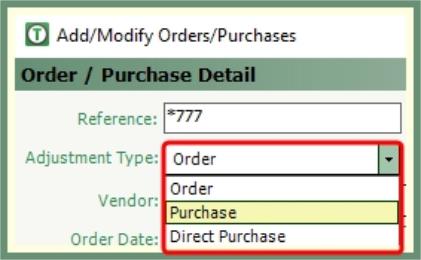
Enter a unique reference which can be the PO#; or you can leave the field blank and press tab and TRUX will assign the next available number.
|
Order: Places a vendor order. The order will remain pending until all parts on the order are received. Purchase: For parts already purchased. Purchased parts will go directly to inventory and therefore receiving the order is eliminated. Jump to Purchase here. Direct Purchase: For purchased parts applied directly to a repair order. Jump to Direct Purchase here.
|
-
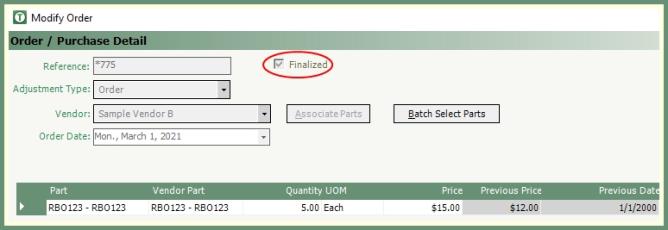
Select a Vendor from the drop down.
-
To view associated parts to this vendor or add parts to this vendor, click Associate Parts. Review current associated parts or populate vendor part number to new parts to be made available from this vendor. Important Note: Parts must be associated with a vendor to be added to an order.
-
Click Batch Select Parts to apply multiple parts from the selected vendor to this order. Click Apply to add the selected parts to the grid.

-
Select the order date if different than the current date.
-
To add parts to the grid manually, click the drop down in the parts field and select a part associated to the selected vendor.
-
Populate the quantity and price.
-
Add an optional note for reference.
-
If the part has been previously purchased from this vendor, the previous price and date fields will be populated as read-only.
-
Repeat for all parts on this order.
-
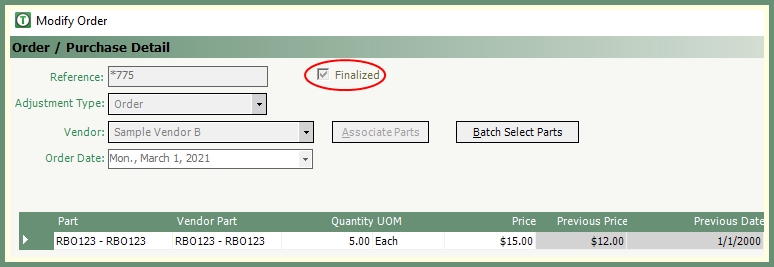
Selecting Finalized indicates this order is final and changes or additions will no longer be made.
-
Finalized orders will display in gray in the grid to indicate the order details are read only.
-
If finalized is left unchecked, the order can be recalled and parts added and/or modified.
-
Save the order when finished.
-
If the order quantity is below the minimum or exceeds the maximum on hand for a part, a warning message will be delivered to be confirmed before continuing with the order.

-
If a PO Email exists for the vendor, an email will generate with the attached PO#.pdf. Click send to deliver.

-
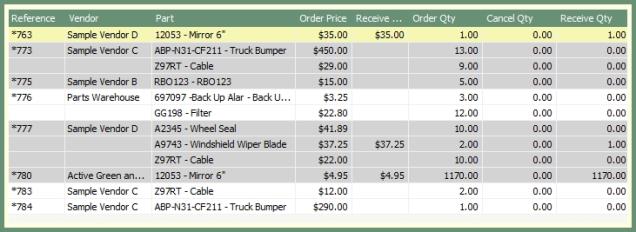
Ordered parts will be added to the pending grid grouped by purchase order until the order is received.
Pending orders can be received partially or in full for orders with a single or multiple parts, apply invoice charges and print labels.
-
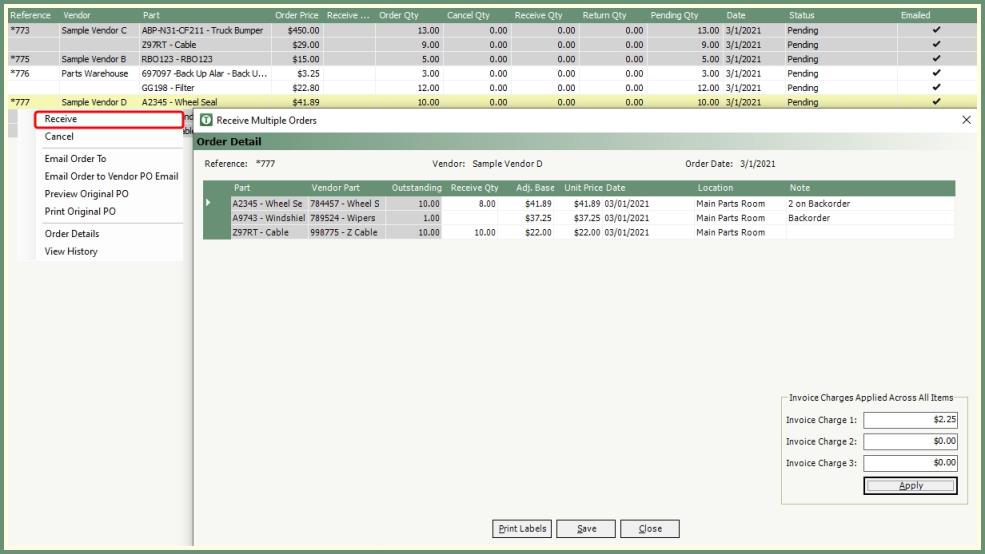
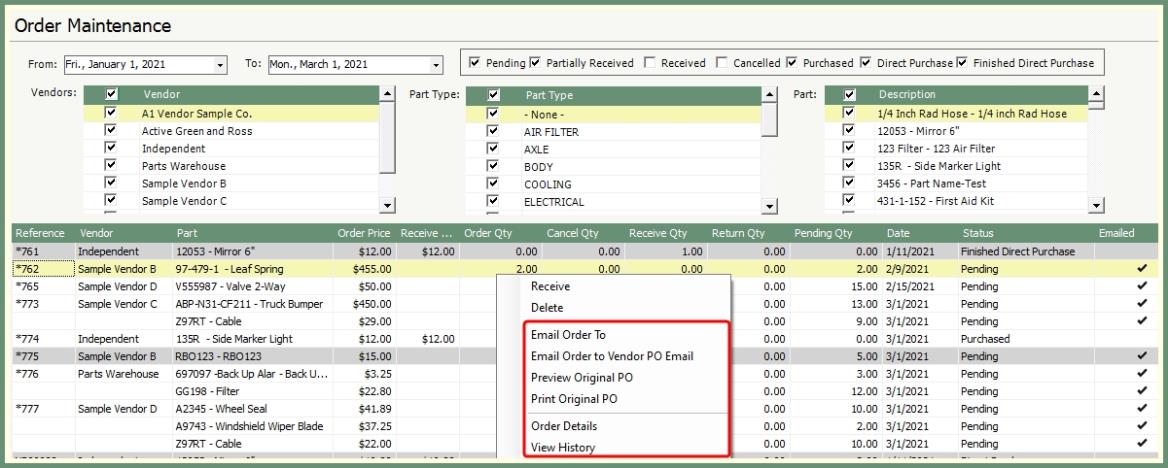
Right click on a pending or partially received order.
-
To receive all parts on an order, right click on the reference field of the order to be received. Receive Multiple Orders window will open.
-
To receive a specific part on an order, right click on the parts field. Receive Order Details window will open. Click Add.

-
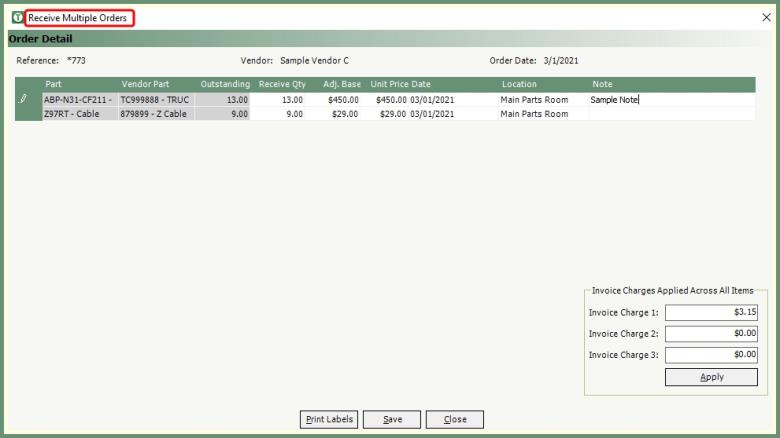
The order reference, vendor and additional information will display above the receive detail grid.
-
The date will default to the current date. Select a receive date if other than the default.
-
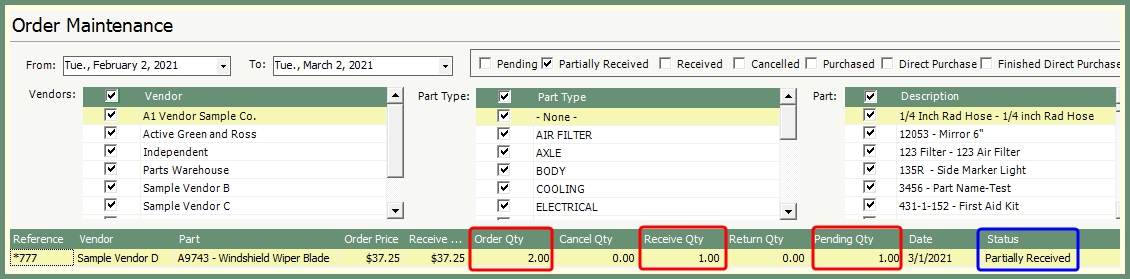
Enter the receive quantity.
|
If the receive quantity is less than the order quantity, the order status for this part will be marked as Partially Received. |
-
Review the inventory location and change if the received part will be stored in a different location.
-
Verify the Unit Price and update if the receiving price is different from the order price.
-
Note field is optional; populate with a note for reference if needed.
-
If this is a part that will only be tracked for purchase and not for inventory, select Balance Out The Inventory.
For Example: Windshield Wiper Fluid. This item can be tracked for purchase while the inventory is marked as zero as it is considered a consumable and will not be applied to repair orders.
-
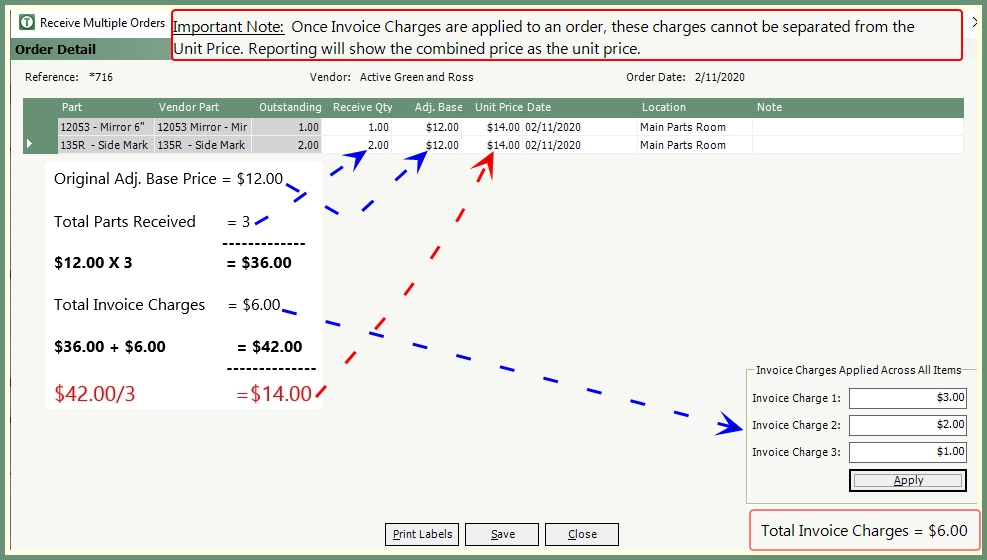
If there are additional invoice charges to be applied; such as freight charges, taxes and/or fees; these charges can be entered in the Invoice Charge 1, 2 & 3 fields. Click Apply and save the entry.
|
Note 1: The Adj. Base field will retain the original price.
Note 2: The invoice charges will be combined with the base price and then divided across all unit prices on the order. See the example to the left. |
-
To generate labels for inventory storage, click Print Labels for received parts on this order.
-
Click Save.
Add purchased parts directly to a new or existing repair order.

-
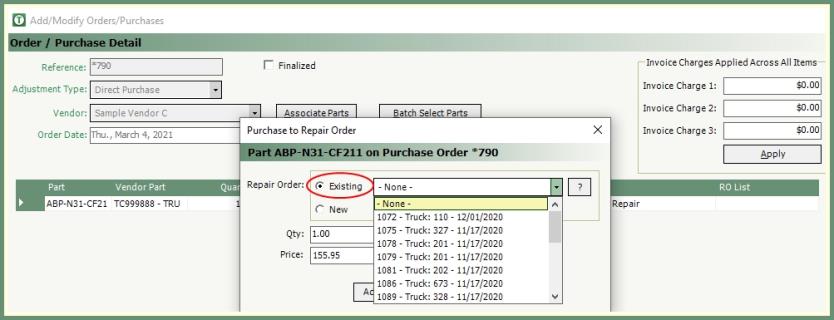
In Order/Purchase Detail, select Adjustment Type: Direct Purchase.
-
Populate the required fields, invoice charges and parts grid as usual.
-
Right click in the RO List field and select Add to Repair Order. Confirm the prompt to save.
-
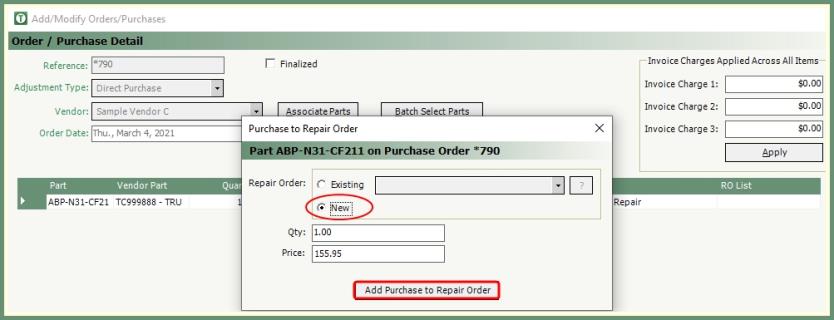
Select Existing or New.
|
Existing:
|
|
New:
|
-
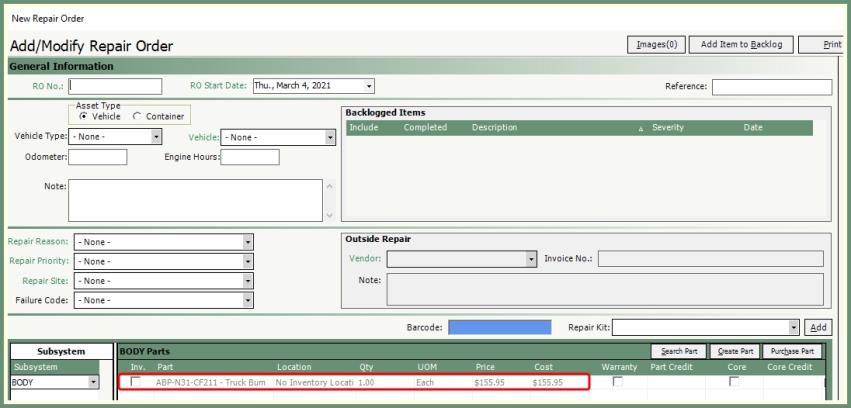
The RO List field will populate with the existing or new repair order.
-
Select Finalized if this order is final.
-
Click Save to complete.
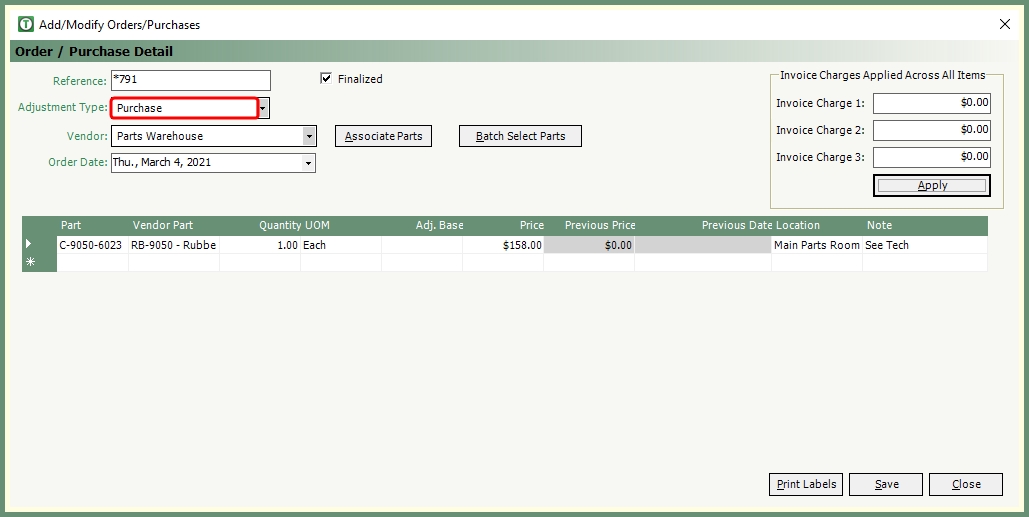
Create a purchase order for parts that will not be received and will automatically save to inventory.
-
In Order/Purchase Detail, select Adjustment Type: Purchase.
-
Populate the required fields, invoice charges and parts grid as usual.
-
Print Labels if needed.
-
Click Save.
-
The purchased part will be added to inventory.
Right click options allow you to email or preview purchase orders and view order details and history.
-
Purchase Order forms can be customized. Contact [email protected] for assistance.
-
Email Order To will email the purchase order to email recipients you specify.
-
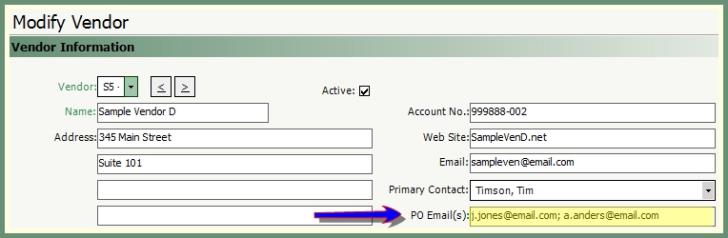
Email Order to Vendor PO Email will email the purchase order to email recipients identified in the Vendor PO Email field.

-
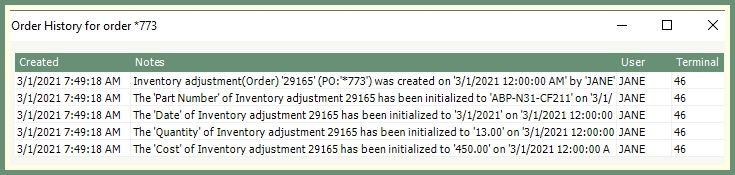
View History displays a log of actions regarding this order by date, time, user and terminal.
Right click on a pending order to delete the order.
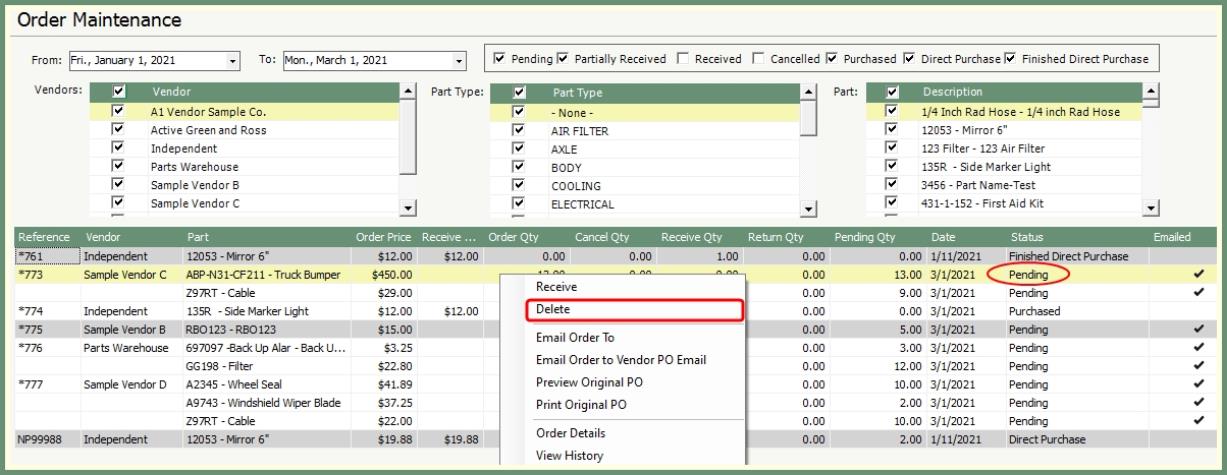
-
Right click on an order with the status of Pending.
-
Select Delete. The pending order will be removed from the grid.
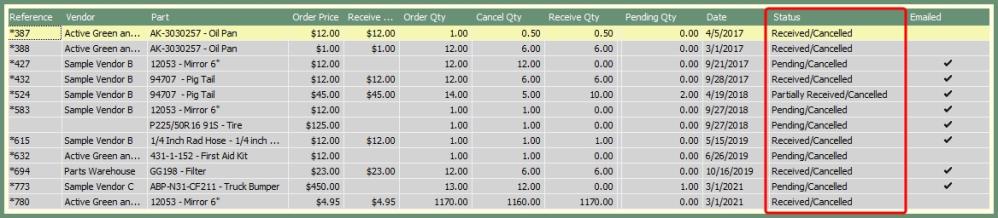
Finalized orders with a status of Pending or Partially Received can be canceled.
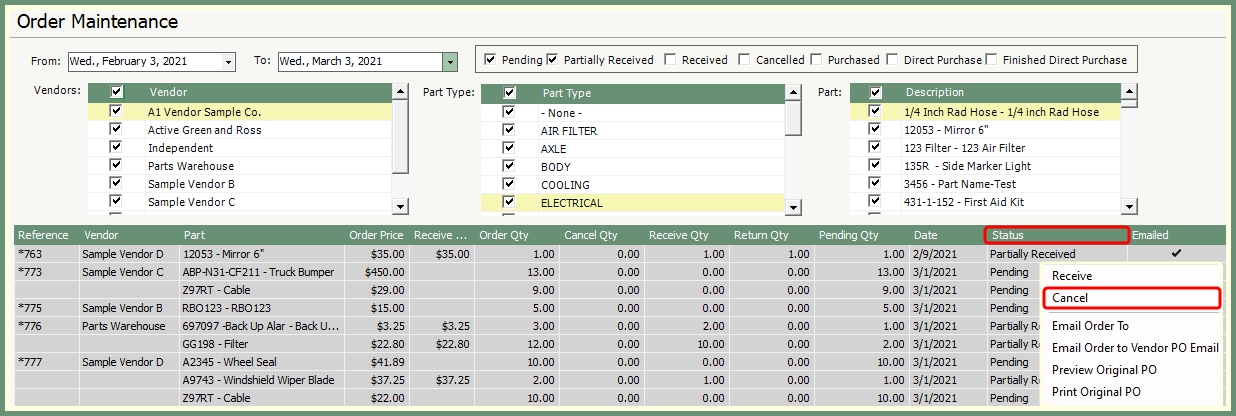
-
Right click on a finalized order in gray with a status of Partially Received or Pending.
-
Select Cancel.
-
Only non received parts on the order will be available to be cancelled.
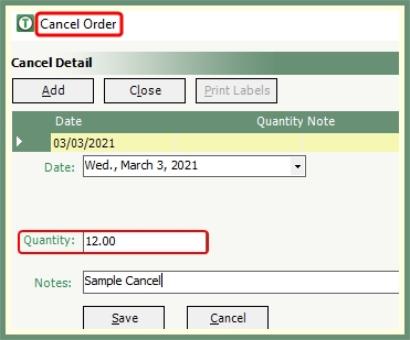
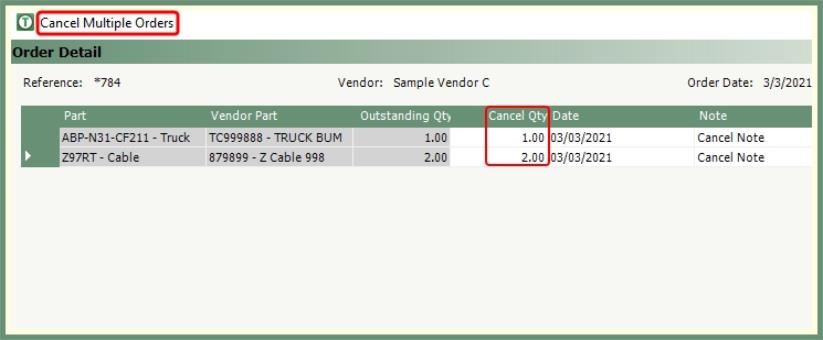
-
If only one part remains on the order, click Add to open cancel details. Otherwise, enter the details into the corresponding field in the grid.
|
|
-
Select the cancel date if other than the current date.
-
Enter the cancel quantity if other than the remaining quantity.
-
Enter a reason for the cancelled order in the required notes field.
-
Click Save and Close.
|
|
The order status will be changed to Pending/Cancelled, Partially Received/Cancelled or Received/Cancelled. |
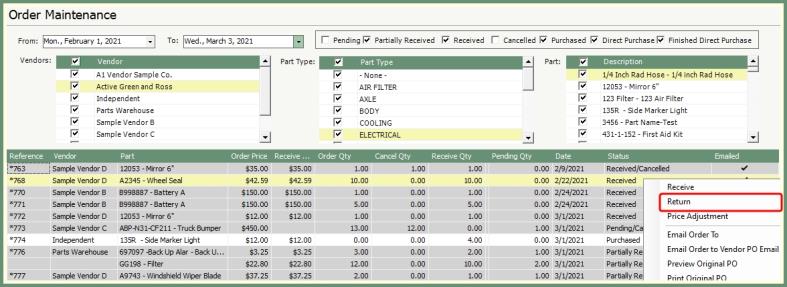
Parts can be returned on orders with a status of received, partially received, purchase and direct purchase.
|

|
-
Right click on an order and select Return.
-
Enter the Return Qty.
-
Select a Return Date if other than the default.
-
Enter a reason for the return in the required Return Note field.
-
Click Save.
-
If the order is to be cancelled following the return, right click on the order, select cancel and follow the steps to Cancel the order.
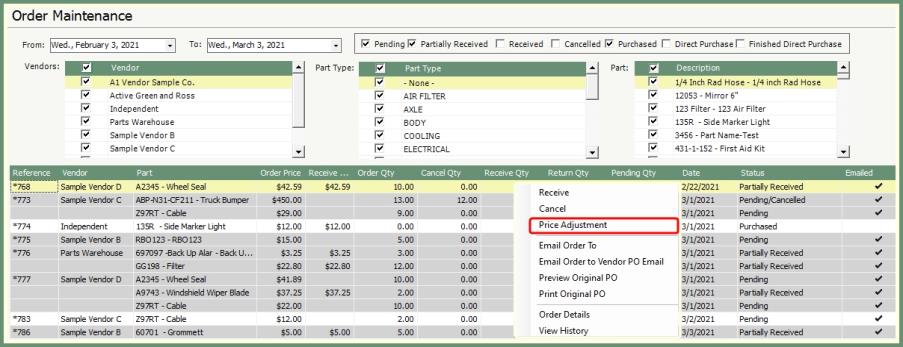
The cost field can be adjusted on received and purchased parts.
|
|
|

-
Right click on an order and select Price Adjustment.
-
Only Cost and Invoice Charge fields can be adjusted. All other fields are read only.
-
Update Cost field.
-
If needed, enter invoice charges to be applied across all items on the order and click Apply.
-
Click Save.
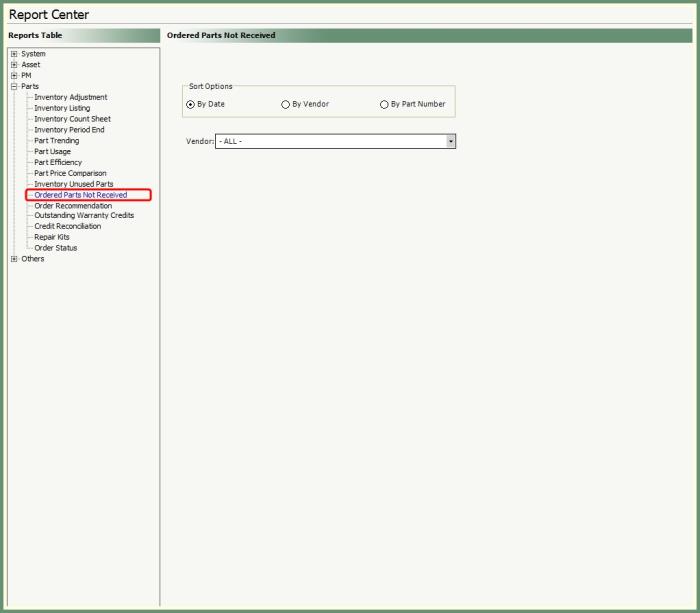
Ordered Parts Not Received
Generate a list of ordered parts not received by all or specified vendor.
|

|
Report on the status of your orders by status for all or specified parameters.
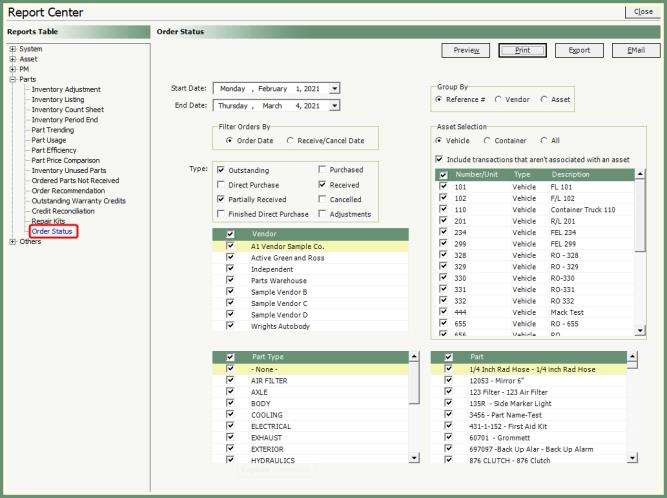
|
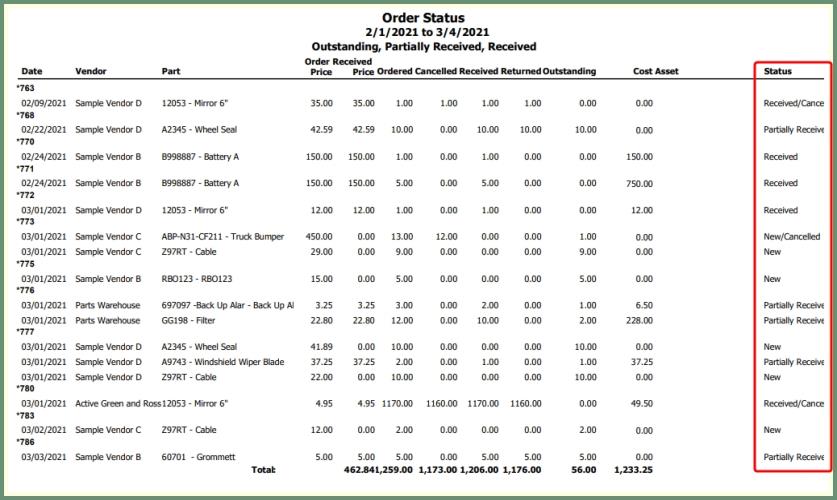
|
Compare the last and average price by vendor for all or select parts.

|
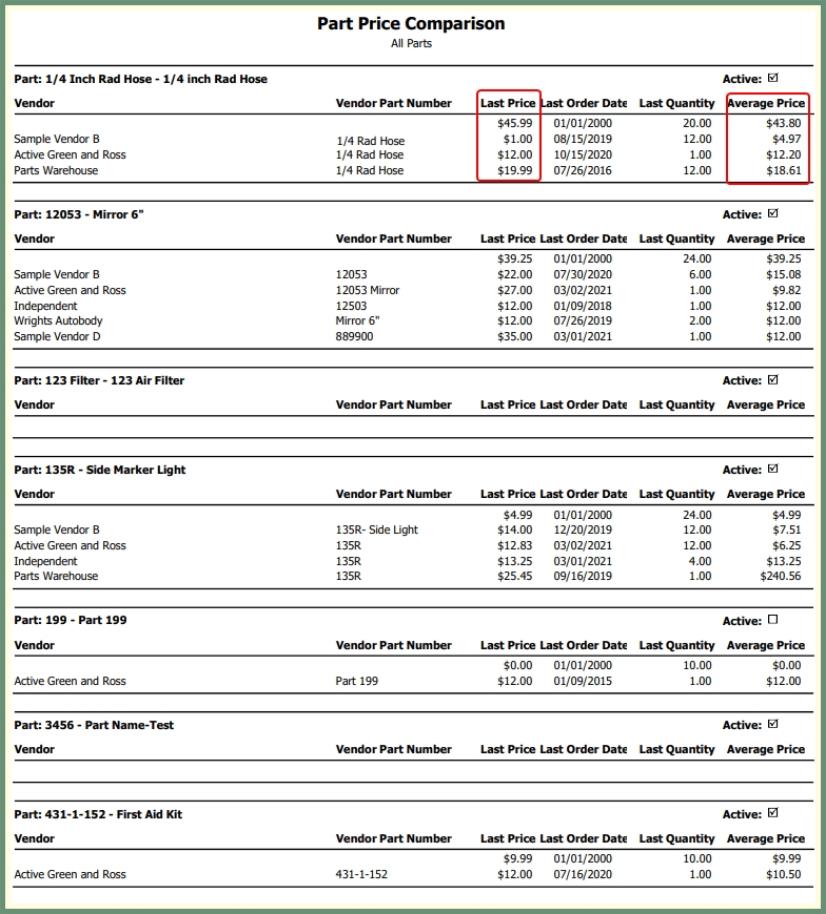
|
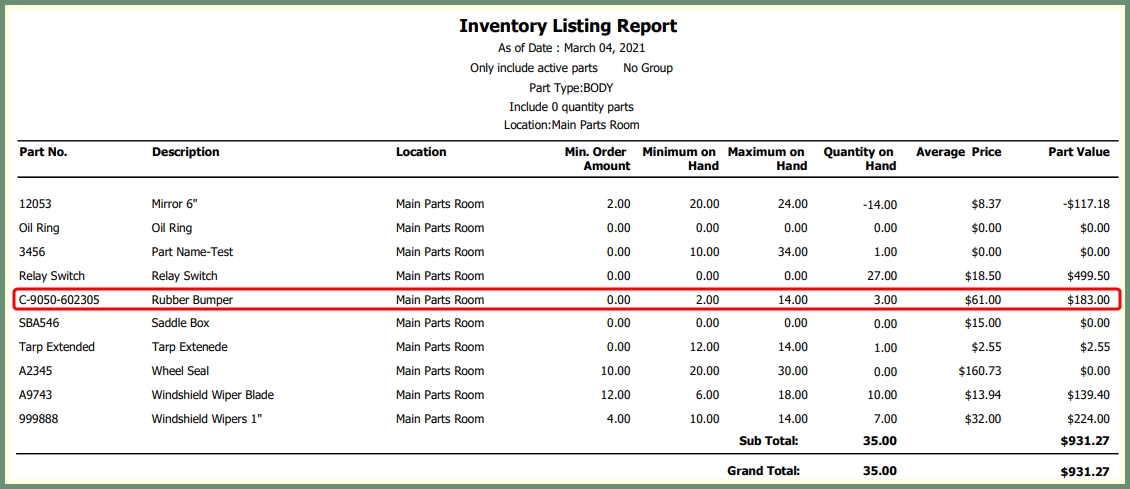
Commonly used for month-end inventory to view your start and end inventory value by asset and location.
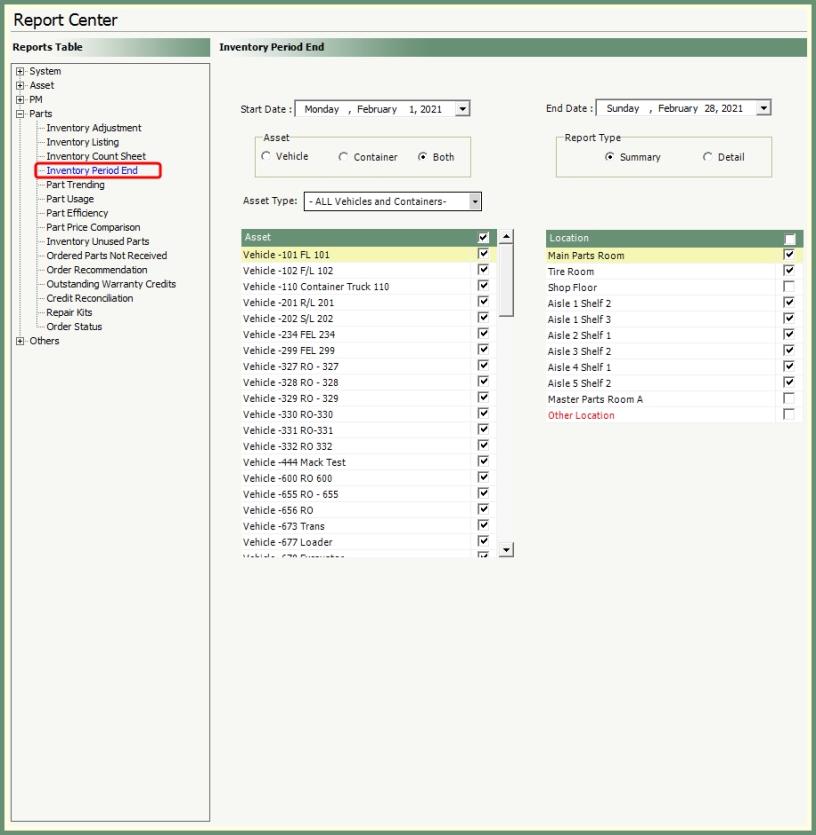
|

|